
Interested in a video but short on time to watch the whole thing? No worries, this I’ve get you covered: in this article, I’ll show a way to download a YouTube video and summarize it within Notion with just a few clicks.
You’ll need Zapier with Google Drive and ChatGPT integrations. Go to https://zapier.com/app/connections and add the following integrations:
To integrate with Zapier, follow these steps.
To integrate with Zapier, follow the steps here.
Notion is optional. The TXT files can be stored as files on your Drive. The process basically looks like this:
1. Download a YouTube video, 2. Upload the MP3 to Google Drive, 3. Send to the file to ChatGPT, 4. Summarize, 5. Send the summary to Notion
1: Download a YouTube video you want to transcribe and summarize
First, download ytdlp-interface, a Windows graphical interface for yt-dlp, a simple YouTube downloader. Since v1.2, the interface also accepts non-YouTube URLs, so feel free to experiment.
Note: there are dozens of online tools for downloading YouTube videos, but they are riddled with ads and don’t always work as expected.
To use ytdlp-interface, unpack the archive in a new folder at a location of your choice, and run ytdlp-interface.exe.
Download link for the latest version (64 bit): https://github.com/ErrorFlynn/ytdlp-interface/releases/download/v2.14.1/ytdlp-interface.7z

Once you run ytdlp-interface, adjust a few options:
- Convert audio to MP3 : check this box. For transcription, we won’t need the video, only audio. This will save some time and tokens.
- Download folder: Choose a folder on Google Drive that is synced with the cloud. In my case, it’s
G:\My Drive\YouTube Downloads.Whenever I download a video, the MP3 file is saved in the folder and sent to Google Drive. - In the Settings menu, check the
Automatically remove completed itemssetting.
How to use ytdlp-interface:
- Open the ytdlp-interface program
- Paste the link to the YouTube video you want to have transcribed
- Press Download
- Wait until it completes the task (downloads the video, extracts the MP3 and uploads the MP3 to Google Drive). It usually takes around 10–20 seconds.
2: Set up you Zapier automation

Step 1: New file in folder (Google Drive)
This step triggers the entire Zapier workflow whenever a new file (our MP3 audio file) is uploaded to a specific folder in Google Drive.
App: Google Drive is used as the app to monitor the folder for new file uploads.
Trigger Event: “New File in Folder,” which means Zapier will start the workflow each time it detects a file has been added to the designated folder.
Account: To integrate Google Drive with Zapier, follow these steps.

Now, adjust settings in the “Configure” section:
Drive: This field specifies which Google Drive account to use. In this case, “My Google Drive” is selected.
Folder: This field designates the specific folder within the Google Drive to monitor. Here, it’s set to “YouTube Downloads,”
Include Deleted Files? Here, it’s set to “Only return non-deleted files,” meaning the workflow will ignore any files that have been deleted in the folder and will only trigger for newly uploaded, active files.
Test the step and preceed to the next step of the workflow by pressing “+”
Step 2: ChatGPT transcription

In Step 2, “Create Transcription,” the fields are configured as follows:
- App: This field selects the application to be used for the action. Here, “ChatGPT” is chosen.
- Action event: This field specifies what action ChatGPT will perform. In this case, the action is set to “Create Transcription,” indicating that ChatGPT’s Whisper feature will transcribe the content of the newly detected file (MP3 audio file) into text.
- Account: Your connected ChatGPT account used to perform this action.
Now, in the “Configure” section:

File: This field specifies the file that will be transcribed. Here, it is connected to the file from Step 1 (“New File in Folder” in Google Drive), ensuring that the newly uploaded file in the designated folder will be used for transcription.
Prompt: This field allows the user to input specific instructions or a prompt for ChatGPT to follow during transcription. Leaving it blank will usually result in a standard transcription, while adding text can guide ChatGPT to, for example, focus on certain aspects or styles of transcription (like summarizing key points as it transcribes).
Response Format: This field specifies the format of the transcription output. It’s set to “Text,” which means the output will be in plain text format. Other formats (if available) might include structured data types, but “Text” is commonly chosen for straightforward transcriptions.
Language of the Audio: Here, the user can specify the language of the audio file to assist ChatGPT in correctly processing the transcription. This field can be left blank if the language is detected automatically, or filled in with the language code (e.g., “en” for English) to enhance accuracy.
Note: Please note that the ChatGPT Whisper model is designed primarily for audio-to-text transcription. However, a key limitation of Whisper is that it does not differentiate between speakers. This means that, in a conversation or multi-speaker audio file, Whisper will transcribe all spoken content into one continuous block of text without attributing specific lines to individual speakers. This is not a proplem for single-speaker videos, but may not produce best results when there are multiple speakers involved (especially when they’re disagreeing on a topic).
Step 2: ChatGPT summary
This step produces a TL;DW summary of the video. It’s a relatively short and rarely exceeds one paragraph.

- App: This field selects the application to be used for the action. Here, “ChatGPT” is chosen, indicating that ChatGPT will be responsible for handling this step.
- Action event: This specifies what action ChatGPT will perform. The action selected is “Summarize Text,” meaning ChatGPT will take the text from the previous step (the transcription) and create a summarized version.
- Account: This field indicates the ChatGPT account being used to perform this action. The account specified here is “ChatGPT michal.wlosik@gmail.com,” which ensures the action utilizes the correct account credentials.

- Text to Be Summarized: This field designates the input text that will be summarized. It’s linked to the output from Step 2, where the transcription was created. This setup ensures that ChatGPT uses the transcription as the content for summarization.
- Model: This specifies which language model will be used to perform the summarization. Here, “gpt-4-mini” is selected, indicating a smaller version of the GPT-4 model optimized for specific tasks or constraints. Feel free to choose different models based on processing requirements or output quality preferences.
- Max Tokens: This field limits the maximum number of tokens (or words/characters) that the model can output for the summary. It’s set to 2048, which provides a substantial amount of output space for a detailed summary, though the exact length may vary based on the input.
- Temperature: This field controls the “creativity” or randomness of the model’s responses. A temperature of 1.0 indicates a balanced setting, allowing for some creativity without becoming overly random. Lower values make the output more deterministic, while higher values increase variability.
- Top P: This is another parameter that affects the diversity of the output by controlling the probability distribution of possible responses. Higher values allow the model to consider a wider range of potential outputs.
Step 4: ChatGPT conversation
This is a step I added to get a more nuanced summary of the video. Set it up as follows:

- App: This field specifies the application to use for this step. Here, “ChatGPT” is selected, indicating that ChatGPT will handle the conversation.
- Action event: Select “Conversation,”
- Account: This field indicates the ChatGPT account used to perform the conversation.

The “Configure” section has the following settings:
- User Message: This field contains the prompt or message given to ChatGPT to guide its response. Here, the user prompt is "Write an extended summary of," followed by the output from Step 2 (the transcription content). This message directs ChatGPT to produce a more detailed and elaborative version of the summarized content from Step 3. Feel free to experiment with this prompt to control what ChatGPT does with the transcript.
- Model: This specifies the language model used for the task. The selected model here is "gpt-4-mini," indicating a smaller, resource-efficient version of GPT-4, tailored for quicker responses or lighter tasks.
- Memory Key: This field is optional and allows the user to set a unique memory key. This can be used to retain contextual information across multiple interactions within the workflow, providing ChatGPT with continuity in responses if needed.
- Image: leave blank, as no image is needed for the conversation.
- User Name: This field allows for the customization of the conversation style or tone by personalizing it with a user name. It could be filled in to make responses more tailored.
Step 5: Formatter by Zapier
This is a step I added to format the title of the summary that will be used in the resulting Notion card later on.

It basically takes the .mp3 out of the name. Set up the Configure section like this:

Step 6: Google Drive: Create file from text (optional step!)
This step is optional and only needed if you’d rather save the .txt files on Google Drive (and not in Notion).
Set this step up as follows:

Folder: This field designates where the new file will be saved in Google Drive. It’s set to YouTube Downloads, meaning the file will be stored in this specific folder.
File Name: This field sets the name of the file to be created. Here, it’s dynamically generated as Summary of [Output from Step 5]… .txt, where the content of Step 5 (Formatter output) is used to title the file without the .mp3 in the name.
File Content: This field specifies the content that will go into the file. It’s organized as follows:
- Summary: The summary from Step 3 is included here, providing a concise version of the transcription.
- Extended summary: The extended summary generated in Step 4 is added here, giving a more in-depth overview based on the conversation with ChatGPT.
- Full text: The full transcription from Step 2 is also included, providing the complete original content for reference.
This structured format ensures the file contains all versions of the processed text — summary, extended summary, and full transcription — in an organized manner.
Convert to Document?: This toggle allows the user to choose whether to convert the file to a Google Docs format. It is set to “False,” meaning the file will be saved as a plain text (.txt) file rather than a Google Docs document.
Step 7: Create a Notion page
In this step, the output the Transcript + Summary are saved as a new structured page within Notion.
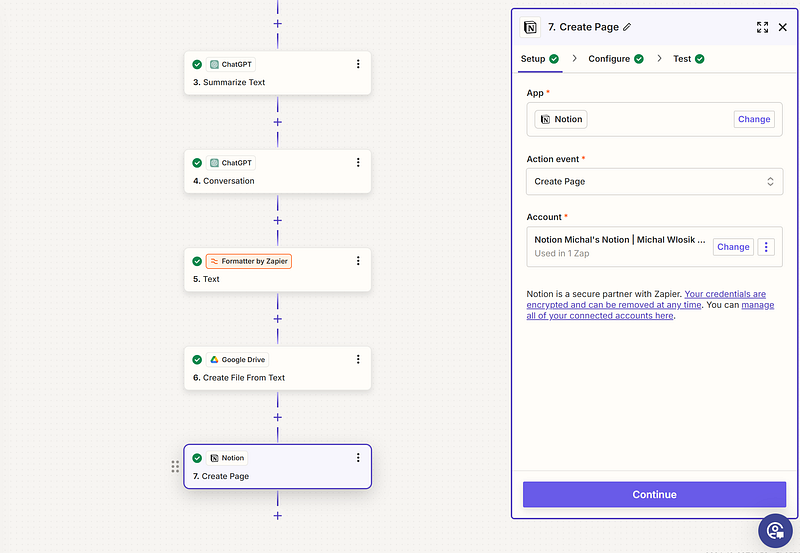
- App: “Notion” is chosen, indicating that Notion will handle this step.
- Action event: This field defines the specific action to be performed in Notion. The action selected is “Create Page,” meaning a new page will be created in Notion based on the specified inputs.
- Account: This specifies the Notion account to be used for creating the page.
In the Configure section:

In Step 7, “Create Page” in Notion, the configuration fields are set up as follows:
Parent Page: This field designates the location in Notion where the new page will be created. Here, “Personal” is selected as the parent page, meaning the new content will be added under this existing section in Notion.
Title: This field specifies the title of the new Notion page. It’s dynamically set to “Summary of [Output from Step 5],” with content drawn from the Formatter step, providing a descriptive and relevant title for the page based on the processed file’s topic.
Content: This field is where the main content for the Notion page is structured. It includes the following sections:
You can use basic Markdown syntax (##, ### etc.) for formatting H1, H2 etc. See guide here. So, the content section could be structured like this:
- ## TL;DW: (Too Long; Didn’t Watch) Here, it uses the output from Step 3, where ChatGPT produced a brief summary of the transcription. This section provides a high-level overview, making it easy for users to get the main points at a glance without going into details.
- ## Summary: This section contains an extended summary generated in Step 4 (labeled as “Reply”). It offers a more detailed explanation, elaborating on key points from the transcription. This is beneficial for users who want a fuller understanding but still prefer a condensed version of the complete content.
- ## Full transcript: This section includes the complete transcription output from Step 2, labeled here as “Content.” It’s the full, unabridged text of the original transcription. This is useful for users who need access to every detail or want to refer back to specific parts of the transcription that might not be covered in the summaries.
Icon: This optional field allows an icon to be added to the Notion page, helping visually categorize or personalize it. In this case, no icon has been specified.
Now, make sure the zap runs and forget about it!
How it works
So, once set up, I can copy-paste a YouTube link into ytdlp, and the remaining steps are all automated — a new structured Notion page is generated after the conversion.
So, for the example video:
I get this in Notion:

That’s it
If you liked the automation, buy me a coffee to keep me going, thanks!


