
If you enjoy the convenience of manual note-taking on the Onyx Boox Note but wish for the organizational capabilities of Notion, this process is a perfect solution for you. In this article, I’ll explain how to automate exporting handwritten notes from Onyx Boox, using ChatGPT for OCR and summarization, and sending the notes to Notion.
As the hero image above shows, my handwriting is not just poor but consistently sloppy, filled with unfinished sentences and hastily scribbled thoughts. I often write this way to quickly capture ideas before they slip away — something I believe many people can relate to.
With ChatGPT, we can now convert these messy notes into text, which is then neatly summarized in Notion. This helps me make sense of my thoughts, even years down the line.
Step 1. Bind your Boox Note to Dropbox
First, create your Dropbox account if you don’t have one.
I chose Dropbox over Google Drive for this integration specifically because of Dropbox’s super-useful Folder Automation feature. More on that later. Also, the free Dropbox plan comes with 2GB of cloud storage space — this should be more than enough for handwritten notes.
Get 500 MB extra storage if you install Dropbox via my referral link.
On your Onyx device, open the Notes tab on the Boox Air 2 and click the menu button in the top-right corner. Select Sync settings.

Next, click Bind next to Dropbox sync. You will be sent to the browser to log into your Dropbox account. Follow the instructions on the screen and click Allow when prompted.
This step will add automatic syncing of your notes to your Dropbox account upon closing a note. The PDF notes are saved to the Dropbox/Apps/onyx-knote/noteair2-notepads folder on Dropbox.
There is no need to enable the All notes are automatically synced to ONYX cloud option.
Step 2. Enable Dropbox automation for PDFs
This is a key step for the ChatGPT integration to work.
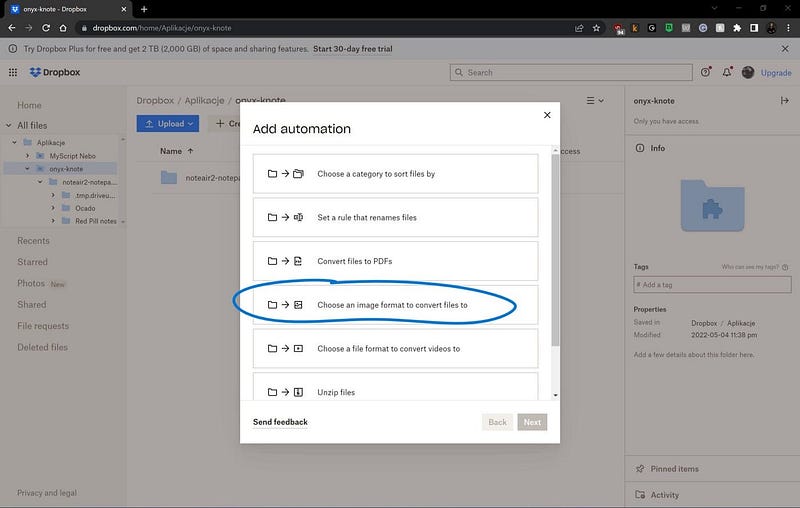
Open your Dropbox account in your web browser. Go to the Dropbox/Apps/onyx-knote/ folder and click the three dots icon next to the noteair2-notepads folder. Click Add automation.
There, select Choose an image format to convert files to (either JPG or PNG, it doesn’t really matter).
Next, select Choose an image format to convert files to.
Next, select All supported file types and Save as: JPG (or PNG, it doesn’t really matter).
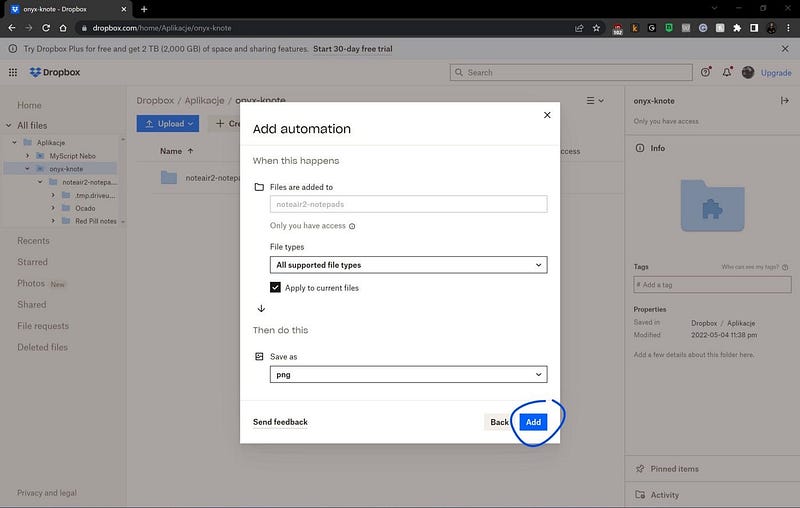
This step basically enables automatic conversion of all the PDF files in the Dropbox\Apps\onyx-knote\onyx\NoteAir2\Notepads\NotepadName
folder to images.
- Each PDF file in the folder will be automatically converted to an image file of the same name (JPG or PNG).
- If a note has more than one page, the JPG or PNG images will be automatically saved in respective subfolders of the Dropbox\Apps\onyx-knote\onyx\NoteAir2\Notepads\NotepadName folder.
Note: There is no need to install Dropbox app for Windows/Mac.
Step 3. Unleash Zapier
Zapier will be needed to orchestrate the process end to end: OCR, text analysis, summarization, and sending to Notion.

First, you need to make connections for all the three tools used in our process in Zapier. Go to https://zapier.com/app/connections and add the following integrations:
- Dropbox. To integrate with Zapier, follow these steps. I chose Dropbox for this process specifically because of its Folder Automation feature, which allows me to convert each new PDF exported from Boox into a series of JPG files. I encountered numerous issues when trying to get the ChatGPT API and Gemini Pro API to work directly with PDF files.
- ChatGPT. To integrate with Zapier, follow these steps.
- Notion. To integrate with Zapier, follow the steps here.
Now, go to your Zapier dashboard and click on “Create Zap”. Our zap will consist of three steps: step 1. monitoring the Dropbox folder for new or updated files, step 2. analyzing images, and step 3. creating Notion Pages.
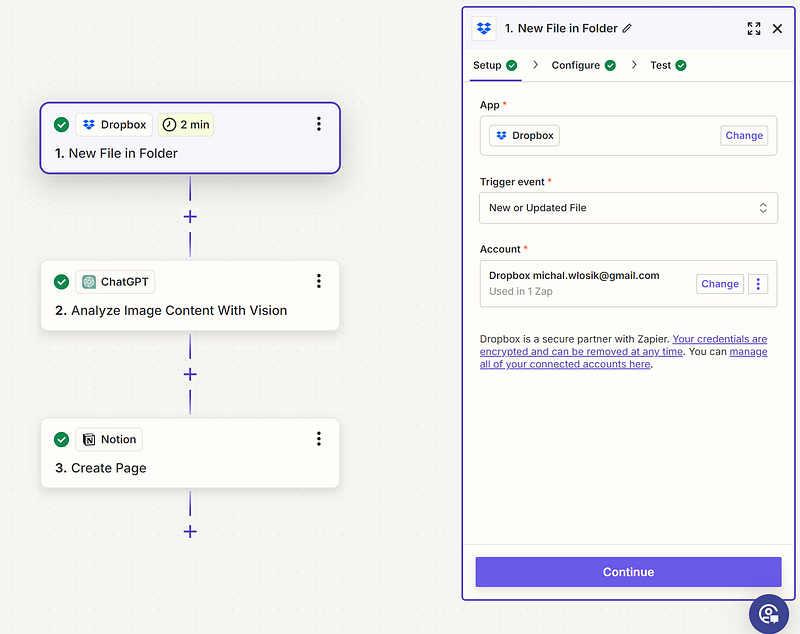
1. Dropbox
In the “Trigger” section, search for and select Dropbox as your app.
- Under “Trigger Event”, select “New or Updated File”. This option will trigger your Zap whenever a new file is added or an existing file is updated in a specified Dropbox folder.
- Under “Account”, click on “Sign in to Dropbox” if you haven’t already connected your account. Authorize Zapier to access your Dropbox account, which will allow it to interact with your files. After successfully linking, your connected Dropbox account will appear (similar to the example shown).
Once your account is linked, specify the Dropbox folder you want Zapier to monitor. For the synced Onyx notes, the default folder is:
Dropbox\Apps\onyx-knote\onyx\NoteAir2\Notepads\NotepadNameUnfortunately, there is no way to change the folder in Onyx.
- Click on “Test trigger” to ensure that Zapier can correctly detect new or updated files in the specified folder. A successful test will show a sample file that Zapier found, confirming that the connection is working properly.
Once testing is successful, click “Continue” to proceed to the next step in the workflow.
This sets up the initial part of your Zap to trigger whenever a new file (i.e. a Dropbox-generated JPG version of the PDF file) is added or updated in the specified Dropbox folder. From here, you can proceed to set up the subsequent actions in your workflow.
2. ChatGPT
After setting up Dropbox as the trigger, click on the “+” button to add a new action.
- App: Select ChatGPT as the action app.
- Action Event: Choose “Analyze Image Content With Vision”. This action will process the content of images, like handwritten notes, and convert them into text.

- Account: Connect your ChatGPT account by clicking “Sign in to ChatGPT” if not already connected. After authorizing, the connected account should appear, as shown in the screenshot.

- In the Message field, enter the instruction for ChatGPT to analyze the image content.
Output the text found in the image and then summarize. Caption these two sections as # OCR text and # Summary respectively.I wrote this prompt to make ChatGPT do two things: extract the content from the image (OCR) and Provide a summary of that content. However, feel free to experiment with the contents of this prompt, sky is the limit. Using # (single hashtag) before a phrase makes it a top-level heading in markdown, which is recognized as a section title in platforms like Notion.
- Under Image, select the file that was pulled from the Dropbox step. This ensures that the image uploaded to Dropbox is used as input for the OCR analysis.
- Set Max Tokens to 1024. This determines the maximum length of the generated output, ensuring enough detail is captured for both the OCR and the summary.
- Click on “Test & Continue” to check if ChatGPT processes the image correctly.

When you proceed to the Notion action step, the text labeled with # OCR text and # Summary will be transferred into a new page. Notion supports markdown formatting, so the # headings will be automatically converted into section headings within the created Notion page. This results in:
- The extracted text appearing under a clearly defined section titled “OCR text”.
- The summarized content appearing under a section titled “Summary”.
3. Notion
In this third step, we will cover how to set up Notion as the final action in the Zapier workflow, which takes the output from ChatGPT and creates a structured page in Notion.
Click on the “+” button after the ChatGPT step to add a new action.
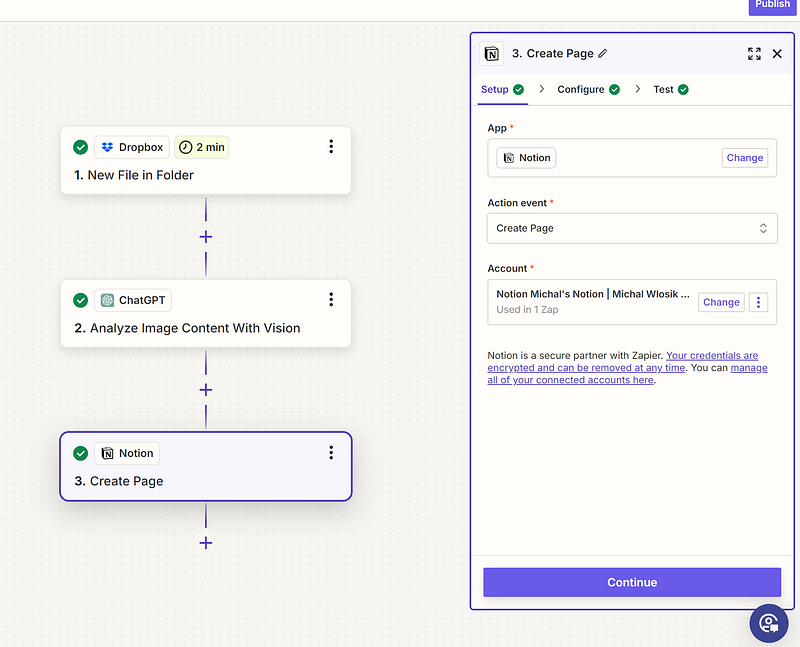
- App: Select Notion as the action application.
- Action event: Choose “Create Page”. This action will create a new page in a specified Notion workspace and database, containing the processed information from ChatGPT.
- Choose your Notion account. Link your Notion account by clicking “Sign in to Notion” if not already connected. Once authenticated, your connected Notion account will be displayed.

- Next, under “Parent Page”, select the Notion workspace or the specific parent page where you want the new page to be added. In the example provided, the selected parent page is titled “Personal”.
- In the “Title” field, select “File Name” from the Dropbox step. This will use the name of the file uploaded to Dropbox as the title of the newly created Notion page.
- In the example, the page title is “Cronenberg (Page 3)”, which corresponds to the name of the file uploaded (it will be different for each processed file, don’t worry).
- Under “Content”, use the output from the ChatGPT step. Click on the “+” icon to insert data from the previous step. In the screenshot, the content field includes both the extracted text and the summary provided by ChatGPT. Since the headings # OCR text and # Summary were used in the ChatGPT output, they will appear as formatted sections in Notion, making the information clear and easy to navigate.
- Optional fields: Icon and Cover. These fields can be optionally used to change the appearance of the newly created Notion page. You can specify a custom icon or cover image for the page by either entering a link or selecting from existing data, though this step is not required for functionality.
Click on “Test & Continue” to verify that the new page is correctly created in Notion. You will be able to see the newly created page in your Notion workspace, structured with the title, OCR text, and summary as defined in the configuration.
Step 5. The final result
The Title of the newly created Notion page will be the file name, such as “Cronenberg (Page 3)”. The Content will include:
- # OCR text: The text extracted from the uploaded image, clearly labeled under this heading.
- # Summary: A summarized version of the extracted content.
These markdown headings will be recognized as section titles in Notion, which will help organize the content for easy reading.

That’s it!
If you liked the automation, buy me a coffee to keep me going.


